风格迁移(一):原始风格迁移

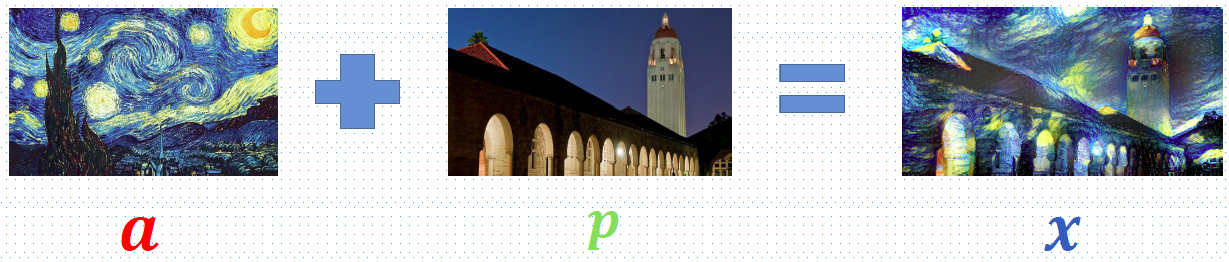
风格迁移,是一个非常有意思的任务,使用这种方法,可以将一张图片的风格“迁移”到另外一张图片上。如下图:

从上面的图看一看出,风格迁移就是输入一张图片,在持本身内容大致不变的情况下,结合一张艺术图片,然后生成出带有艺术效果的图片。风格迁移自2015年Gatys第一次提出开始,其热度一直不断攀升,期间还出现了一个非常火爆的“风格迁移”滤镜App——Prisma,App官网上面的风格迁移图片做的非常好看,真是美如画,可以去看看一下。

风格迁移自2015年发展到现在,涌现出许多非常不错的算法,这些算法大致可以分为三种:

  • 原始风格迁移:固定风格固定内容;
  • 快速风格迁移:固定风格任意内容;
  • 极速风格迁移:任意风格任意内容;

风格迁移的大致思路基本都是通过定义两种loss:Content loss和 Style loss。分别对应着输出图片与 Content Image 内容上的差异,以及与 Style Image 在风格上的差异。最终的 Loss 为两种 Loss 的加权和,通过迭代优化,不断减小loss,使得生成图片既包含content image的内容也具有style image的风格。

a图的style 和 p图的content 进行融合,得到第三幅图x
代价函数loss
我们的目的是生成一张在内容上尽量与Content image 保持一致,在风格上尽量与Style image要保持一致的图片,现在输入输出,loss都知道了,那怎样具体去设计Content loss和Style loss呢。

原始风格迁移(style transfer)

原始风格迁移是在固定风格、固定内容的情况下做的风格迁移,这是最慢的方法,也是最经典的方法。原始风格迁移方法思路比较简单,将生成图片看做是一个训练的过程,训练变量就是图片,通过不断的迭代优化,生成与内容图片以及风格图片都尽量一致的图片,这种方法的缺点就是速度慢,效率低。这种方法可以参考这篇文章: A Neural Algorithm of Artistic Style。

网络结构

在进行风格迁移任务时,需要使用一个预训练网络对图像提取特征,通过这些特征来衡量两个图像之间的内容差异和风格差异。在这里我选用了VGG16,提取其中几个比较重要的层的特征。

1
2
3
4
5
6
7
8
9
10
11
12
13
14
15
16
17
18
19
20
21
22
23
24
class VGG(nn.Module):

def __init__(self, features):
super(VGG, self).__init__()
self.features = features
self.layer_name_mapping = {
'3': "relu1_2",
'8': "relu2_2",
'15': "relu3_3",
'22': "relu4_3"
}
for p in self.parameters():
p.requires_grad = False

def forward(self, x):
outs = []
for name, module in self.features._modules.items():
x = module(x)
if name in self.layer_name_mapping:
outs.append(x)
return outs

vgg16 = models.vgg16(pretrained=True)
vgg16 = VGG(vgg16.features[:23]).to(device).eval()

经过修改之后的VGG16可以提取relu1_2、relu2_2、relu3_3、relu4_3这几层的特征图。打印这几层特征图的大小,如下:

1
2
3
4
relu1_2 [1, 64, 512, 512]
relu2_2 [1, 128, 256, 256]
relu3_3 [1, 256, 128, 128]
relu4_3 [1, 512, 64, 64]

内容 Content loss

在进行风格迁移时,如何保证生成图像与内容图像的一致性,如何使用定量指标去衡量两张图片在内容上的差异呢。在上面的那张网络结构图上,采用的是relu3_3层特征去比较内容差异。注意,在这里,没有使用Image Transform Net。图片X,Y之间的内容差异可以如下表示:

$F_{XL}$表示将第relu3层的feature map展开后的一维向量。我们可以简单的认为,输入图片X在网络的第relu3层的内容就是它。根据生成图像和内容图像在relu3层的输出的特征图的均方误差(MeanSquaredError)来优化生成的图像与内容图像之间的内容一致性。

风格 Style loss

在Gatys那边文章中引入Gram矩阵来表示图像的风格,通过Gram矩阵来计算图片风格之间的差异。假设预训练网络在第L层的特征图大小1chw,Gram矩阵的大小为cc,每一个元素Gram(k,l)表示第k个通道的特征图和第l个通道的特征图相乘求和,则

上面知道了图片风格的定义,那么图片之间的风格差异就是两幅图的Gram矩阵的差异。具体代码实现如下:

1
2
3
4
5
6
def gram_matrix(y):
(b, ch, h, w) = y.size()
features = y.view(b, ch, w * h)
features_t = features.transpose(1, 2)
gram = features.bmm(features_t) / (ch * h * w)
return gram

图片X,Y之间的风格差异定义如下:

在风格迁移中,我们需要最小化几层内容差异$D_C^L(X,Y)$和几层风格差异$D_S^L(X,Y)$,我们的目标函数就最小化这两者的和。

其中$L_C$表示内容上需要输出的几层,$L_S$表示风格需要输出的几层。w表示相应的权重。从上面的那个网络结构图可以看出,在内容上只比较了relu3_3层的差异,在风格上比较了relu1_2、relu2_2、relu3_3、relu4_3 四层的差异。

完整代码实现 code

1
2
3
4
5
6
7
8
9
10
11
12
13
14
15
16
17
18
19
20
21
22
23
24
25
26
27
28
29
30
31
32
33
34
35
36
37
38
39
40
41
42
43
44
45
46
47
48
49
50
51
52
53
54
55
56
57
58
59
60
61
62
63
64
65
66
67
68
69
70
71
72
73
74
75
76
77
78
79
80
81
82
83
84
85
86
87
88
89
90
91
92
93
94
95
96
97
98
99
100
101
102
103
104
105
106
107
108
109
110
111
112
113
114
115
116
117
118
119
120
121
122
123
124
125
126
127
128
129
130
131
132
133
134
135
136
137
138
139
'''
@author: niceliu
@contact: nicehuster@gmail.com
@file: neural_style1.py
@time: 8/7/18 10:39 PM
@desc:
'''
import torch
import torch.nn as nn
import torch.nn.functional as F
import torch.optim as optim
from PIL import Image
import matplotlib.pyplot as plt
import torchvision.transforms as transforms
import torchvision.models as models
import numpy as np
cnn_normalization_mean = [0.485, 0.456, 0.406]
cnn_normalization_std = [0.229, 0.224, 0.225]
tensor_normalizer = transforms.Normalize(mean=cnn_normalization_mean, std=cnn_normalization_std)

device = torch.device("cuda:0" if torch.cuda.is_available() else "cpu")

class VGG(nn.Module):

def __init__(self, features):
super(VGG, self).__init__()
self.features = features
self.layer_name_mapping = {
'3': "relu1_2",
'8': "relu2_2",
'15': "relu3_3",
'22': "relu4_3"
}
for p in self.parameters():
p.requires_grad = False

def forward(self, x):
outs = []
for name, module in self.features._modules.items():
x = module(x)
if name in self.layer_name_mapping:
outs.append(x)
return outs

def gram_matrix(y):
(b, ch, h, w) = y.size()
features = y.view(b, ch, w * h)
features_t = features.transpose(1, 2)
gram = features.bmm(features_t) / (ch * h * w)
return gram

def preprocess_image(image, target_width=None):
"""输入 PIL.Image 对象,输出标准化后的四维 tensor"""
if target_width:
t = transforms.Compose([
transforms.Resize(target_width),
transforms.CenterCrop(target_width),
transforms.ToTensor(),
tensor_normalizer,
])
else:
t = transforms.Compose([
transforms.ToTensor(),
tensor_normalizer,
])
return t(image).unsqueeze(0)

def read_image(path, target_width=None):
"""输入图像路径,输出标准化后的四维 tensor"""
image = Image.open(path)
return preprocess_image(image, target_width)

def recover_image(tensor):
"""输入 GPU 上的四维 tensor,输出 0~255 范围的三维 numpy 矩阵,RGB 顺序"""
image = tensor.detach().cpu().numpy()
image = image * np.array(cnn_normalization_std).reshape((1, 3, 1, 1)) + \
np.array(cnn_normalization_mean).reshape((1, 3, 1, 1))
return (image.transpose(0, 2, 3, 1) * 255.).clip(0, 255).astype(np.uint8)[0]

def imshow(tensor, title=None):
"""输入 GPU 上的四维 tensor,然后绘制该图像"""
image = recover_image(tensor)
print(image.shape)
plt.imshow(image)
if title is not None:
plt.title(title)

width = 512
style_img = read_image('picasso.jpg', target_width=width).to(device)
content_img = read_image('dancing.jpg', target_width=width).to(device)
vgg16 = models.vgg16(pretrained=True)
vgg16 = VGG(vgg16.features[:23]).to(device).eval()
style_features = vgg16(style_img)
content_features = vgg16(content_img)

style_grams = [gram_matrix(x) for x in style_features]
[x.shape for x in style_grams]
[x.shape for x in content_features]

input_img = content_img.clone()
optimizer = optim.LBFGS([input_img.requires_grad_()]) #将input_img作为变量,不断迭代优化
style_weight = 1e6
content_weight = 1

run = [0]
while run[0] <= 300:
def f():
optimizer.zero_grad()
features = vgg16(input_img) #在这里,我们使用内容作为输入,不过也可以使用噪声图片输入

content_loss = F.mse_loss(features[2], content_features[2]) * content_weight
#在这里 content feature 只提取了relu_3层的特征输出。
style_loss = 0
grams = [gram_matrix(x) for x in features]
for a, b in zip(grams, style_grams):
style_loss += F.mse_loss(a, b) * style_weight

loss = style_loss + content_loss

if run[0] % 50 == 0:
print('Step {}: Style Loss: {:4f} Content Loss: {:4f}'.format(
run[0], style_loss.item(), content_loss.item()))
run[0] += 1

loss.backward()
return loss
optimizer.step(f)

plt.figure(figsize=(18, 6))

plt.subplot(1, 3, 1)
imshow(style_img, title='Style Image')

plt.subplot(1, 3, 2)
imshow(content_img, title='Content Image')

plt.subplot(1, 3, 3)
imshow(input_img, title='Output Image')
plt.show()

这里说明一下,上面的完整代码主要参考这里,还有这里
最终实验结果如下:

从上面的实验结果可以看出,生成的图片即包含有content image的内容,也有style image的风格。上面生成一张512大小的图片,设置的是迭代300次,在tianX上用时10s左右,从速度上来讲还是挺慢的。下一篇博客会介绍一下在此基础上改进的快速风格迁移,以及基于meta network的极速风格迁移,尤其是CVPR2018的基于meta network的风格迁移方法,该方法可以直接在手机移动端运行,可以达到实时风格迁移的效果。

最后

图像风格迁移这个领域,我也是刚开始看,如果对这个方向感兴趣的话,想深入了解的话,就得需要多看看论文。然后搜集查找相关论文是一个比较耗时的过程,还有已经有人整理了不少关于风格迁移相关的论文和代码,想深入了解的话,可以看这里:Neural-Style-Transfer-Papers-Code